
React Router
React Router v4
This new version of react router is totally different from previous versions. Everything is “component” based. A bit hard to get your head around, but here goes.Imports and npm
React router is now broken up into either react-router-dom or react-router-native. The former for browser based code and the latter for react native applications.
We will review the main components, which are:
- BrowserRouter
- Route
- Switch
- Link
- Redirect
Important Props - match and location
You will get passed some props from react-router and they are what make it so powerful.
Probably the most used will be this.props.match
match
First, some terminology
- pathname is what you see in your browsers URL bar.
- path is what you see in the Route components path prop and is returned in match.path. These may have params listed in the format of :myParam
- url is what you see in your browsers URL bar
- isExact will be true if
pathname===pathso:/mypath/:id === /mypath/12BUT/mypath/:id !== /mypath/12/other
match: {
    isExact: true,
    params: {
        param1: '',
        param2: ''
    },
    path: "/myPath/:myId"
    url: "/myPath/12"
}
location
this.props.location is where you will go for the Query string. /mypath?userId=5
location: {
    pathname: "",
    search: "?userId=x",
    state:
}
Extract Query string from location
To get the data in the query string (the stuff after the ? in the url), use the URLSearchParams() JS constructor . This is a standard JavaScript function which returns an object with your query string data:
// example - /mypath?userId=5
{
    userId: 5
}
BrowserRouter
This is the top level component that you will wrap all of your other components in. In Electron I found using MemoryRouter worked better and if you need to have access to your own history component, use just the Router component.
Sidenote
If using redux, BrowserRouter will go inside of redux’s Provider component. Also, there is a weird thing where components using connect won’t rerender. To make them rerender, you must wrap the connect call with react-router’s withRouter higher order function
class MyConnectedComponent extends React.Component{
        render() {
        ....
    }
}
export default withRouter(connect()(MyConnectedComponent));
One way of using BrowserRouter, would be to have an index.js file that will wrap you main app.js file. app.js would have your top bar/navigation and then your initial routes. You can also embed Routes in your ReacDOM render call, just make sure only one Child component is under the BrowserRouter component. This can easily be done by wrapping Routes in a <div>.
As I start working more with this, I can see where you can use routes deeper within the application to conditionally show components.
Here is an example of an the initial component with the BrowserRouter wrapping other Routes:
import {
  BrowserRouter,
  Route
} from 'react-router-dom';
...
const App = () => (
  <BrowserRouter>
    <div className="container">
      <Header /> //Will always show
      //Routes below will conditionally show.
      <Route exact path="/" component={Home} />
      <Route path="/about" render={ () => <About title='About' /> } />
      <Route path="/teachers" component={Teachers} />
      <Route path="/courses" component={Courses} />
    </div>
  </BrowserRouter>
);
Router
Router is similar to BrowserRouter, except Router expects you to inject the history object to it. To do this, we need to use another module. history
> yarn add history
Once installed you will need to load it into your project. Since you will be injecting 'it' into the Router component, you will need to load it at that level:
import { Router, Route, Switch } from 'react-router-dom';
import createHistory from 'history/createBrowserhistory';
...
//Export so that it can be used elsewhere...that is why we are using
//Router instead of BrowserRotuer!
export const history = createHistory();

const AppRouter = () => (
  <Router history={history}>
    <div>
      <Header />
      <Switch>
        <Route exact path="/" component={Login} />
        <Route path="/dashboard" component={ExpenseDashboardPage} />
        <Route path="/create" component={AddExpensePage} />
        <Route path="/edit/:id" component={EditExpensePage} />
        <Route path="/help" component={HelpPage} />
        <Route component={NotFound} />
      </Switch>
    </div>
  </Router>
);

export default AppRouter;
To use your history variable elsewhere, you could do the following:
import AppRouter, { history } from './routers/AppRouter';

//With history import, I can use it on pages that are
//not descendants (i.e. wrapped in my Router component)
if(!loggedin) {
  history.push('/');
}
Route
Route is the component that you will use to define your routes. Here are the basic props:
- path - This is the path to match to. Begins with ‘/‘
- exact - Boolean, just include if you want an exact match
- component or render - either pass a component or you can pass a anonymous function.
If you need to pass props to a component, then you would need to use the "render" option in Route:
<Route path="/about" render={() => <About title="my About" /> } />
Dynamic Routes
You can also make routes dynamic. For example, if you wanted to have a path to an item include the item id or name as part of the path, you can use a colon in front of the dynamic part of the path:
<Route path="/items/:itemId" ... />
The above path would then match if the url was /item/12334 or anything after the /item/.
When using dynamic routes, the component or render function gets passed a prop called match with a params object. In this object you can access the defined dynamic route. In the above case, it would be match.params.itemId
The best way to access or go to these dynamic routes is to use the Link component.
<Link to=/items/${itemId} />
You could map through an array to create multiple links that would match with multiple pages with each page getting an itemId that could then be rendered. Here is an example:
    <Route
       path='/items/:itemId'
       render={ ({match}) => {
           const item = lookupAndGetItem(itemId); // or use find on an array
           return (<Item item={item} />);
          }}
    />
Link and NavLink
Link and NavLink components allow you to create links to specific routes. The main difference between the two is that NavLink will give an "active" class name to the last NavLink clicked.
    <ul className="main-nav">
      <li><NavLink exact to="/">Home</NavLink></li>
      <li><NavLink to="/about">About</NavLink></li>
      <li><NavLink to="/teachers">Teachers</NavLink></li>
      <li><NavLink to="/courses">Courses</NavLink></li>
    </ul>
If you want the active class name to be something other than "active", you can pass the activeClassName prop and send your custom class name through. May be useful when each link that is active looks different than the others.
You can even pass the active style if you want to override some of the active class name's properties. This is done with the activeStyle prop. You will pass this prop a style object. Note that the active class name is still applied and then this style object will override whatever you pass or simply add more style to the link when active.
      <li><NavLink to="/teachers" activeStyle={{ background: "blue"}}>Teachers</NavLink></li>
      <li><NavLink to="/courses" activeClassName="myActiveClass">Courses</NavLink></li>
Redirect
The Redirect component allows you to programatically go to a route. Keep in mind that, by default, the current location is replaced by the new one.
If you want to push a new entry onto the history instead, pass a push prop as well.
//add to history
<Redirect to="/courses/html" push/>
When redirecting from nested routes, you may want to take a different approach with the Redirect component. For example, if you go to a page with nested routes and want to have that page when first loaded "/courses" show one of the routes by default, you will want to put the Redirect inside a Route component of its own:
    <Route exact path="/courses" render={() => <Redirect to="/courses/html" />} />
    <Route path="/courses/html" component={HTML} />
    <Route path="/courses/css" component={CSS} />
    <Route path="/courses/javascript" component={Javascript} />
Note the use of exact and then using the render prop to render our Redirect component.
Redirect using the history prop
There will be times when you will not be able to render a Redirect component, but still need to navigate to a new path.
In these cases you can use the history prop passed to all components rendered from a Route component.
class Home extends React.Component {
    handleSubmit = (e) => {
        e.preventDefault();
        let something = e....value;
        this.props.history.push(newPath);
    }
    render() {
        <form onSubmit={this.handleSubmit}>
            ...
        </form>
    }
}
match prop
Each route that we redirect or link to gets a set of props that we can use in various ways.

A match object contains information about how a <Route path> matched the URL. match objects contain the following properties:
- params - (object) Key/value pairs parsed from the URL corresponding to the dynamic segments of the path
- isExact - (boolean) true if the entire URL was matched (no trailing characters)
- path - (string) The path pattern used to match. Useful for building nested
s - url - (string) The matched portion of the URL. Useful for building nested s
You’ll have access match objects in various places:
- Route component as this.props.match
- Route render as ({ match }) => ()
- Route children as ({ match }) => ()
- withRouter as this.props.match
- matchPath as the return value
If a Route does not have a path, and therefore always matches, you’ll get the closest parent match. Same goes for withRouter.
import React from 'react';
import { Route, NavLink, Redirect } from 'react-router-dom';
import HTML from './courses/HTML';
import CSS from './courses/CSS';
import Javascript from './courses/JavaScript';

const Courses = ({match, }) => (
  <div className="main-content courses">
    <div className="course-header group">
      <h2>Courses</h2>
      <ul className="course-nav">
        <li><NavLink to={`${match.url}/html`}>HTML</NavLink></li>
        <li><NavLink to={`${match.url}/css`}>CSS</NavLink></li>
        <li><NavLink to={`${match.url}/javascript`}>JavaScript</NavLink></li>
      </ul>
    </div>

    <Route exact path={`${match.path}`} render={() => <Redirect to={`${match.path}/html`} />} />
    <Route path={`${match.path}/html`} component={HTML} />
    <Route path={`${match.path}/css`} component={CSS} />
    <Route path={`${match.path}/javascript`} component={Javascript} />
  </div>
);

export default Courses;
By doing the above, if you ever change the route that links to this component, you won't break your nested routes.
Displaying 404 Error Routes using Switch
If you have a list of Route components, without Switch it is very possible that multiple routes will match and multiple routes will be renedered.
This is by design so advanced stuff could be done with Route components.
If, however, you wrap a bunch of Route components in a Switch component, then the first Route that matches will render and that is it.
import { Switch, Route } from 'react-router'

<Switch>
  <Route exact path="/" component={Home}/>
  <Route path="/about" component={About}/>
  <Route path="/:user" component={User}/>
  <Route component={NoMatch}/>
</Switch>
Creating Dynamic Routes Paths
You can create Route parameters by putting a colon in front of the parameter:
<Route path="/teachers/:name" component={Teachers} />
The :name is the parameter and it will be made available to the Teachers component via the passed route props.
![]](https://dl.dropboxusercontent.com/s/gykblaxe43nw603/reacrouter-props-match.png)
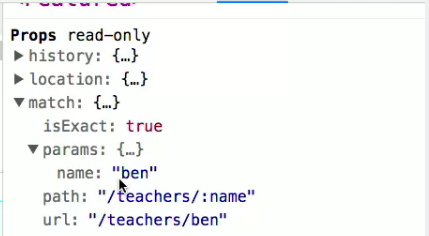
You can access this parameter via props.match.params.paramName.
You can even add multiple parameters in a single path:
<Route path="/teachers/:topic/:fname-:lname" component={Teachers} />

//Teachers component
const Teachers = ({ match }) => {
    let name = `${match.params.fname} ${match.params.lname}`;
    let topic = match.params.topic;
}
Prompt
The Prompt component will allow you to display a message when trying to navigate to a different route if a boolean true is detected.
<form>
    <Prompt
        when={isBlockingState}
        message="You will lose changes, continue?"
    />
    <input onChange={e => isBlockState = true} />
</form>
Rendering Sidebar and Main on One Route
You can accomplish this in multiple ways. One being to create an object with all the routes and their destinations:
import React from 'react';

export const routes = [
  {
    path: '/',
    exact: true,
    sidebar: () => <div>home!</div>,
    main: () => <h2>Home</h2>
  },
  {
    path: '/posts',
    sidebar: () => <div>posts sidebar</div>,
    main: () => <h2>posts main</h2>
  },
  {
    path: '/orders',
    sidebar: () => <div>Orders Sidebar</div>,
    main: () => <h2>Orders Main</h2>
  },
  {
    path: '/customers',
    sidebar: () => <div>Customer Sidebar</div>,
    main: () => <div>Customer Main</div>
  },
  {
    path: '/students',
    sidebar: () => <div>Students Sidebar section</div>,
    main: () => <div>Students Main section</div>
  }
];
Then in your components you will loop over the above object and pull what you need to create your routes.
Here is the sidebar component
import React from 'react';
import { Route, Link } from 'react-router-dom';
import { routes } from '../routes';

function Sidebar() {
  return (
    <div
      style={{
        padding: '10px',
        width: '40%',
        background: '#f0f0f0'
      }}
    >
      <ul style={{ listStyleType: 'none', padding: 0 }}>
        <li>
          <Link to="/">Home</Link>
        </li>
        <li>
          <Link to="/posts">Posts</Link>
        </li>
        <li>
          <Link to="/orders">Orders</Link>
        </li>
        <li>
          <Link to="/customers">Customers</Link>
        </li>
        <li>
          <Link to="/students">Students</Link>
        </li>
      </ul>

      {routes.map((route, index) => (
        // You can render a <Route> in as many places
        // as you want in your app. It will render along
        // with any other <Route>s that also match the URL.
        // So, a sidebar or breadcrumbs or anything else
        // that requires you to render multiple things
        // in multiple places at the same URL is nothing
        // more than multiple <Route>s.
        <Route
          key={index}
          path={route.path}
          exact={route.exact}
          component={route.sidebar}
        />
      ))}
    </div>
  );
}
export default Sidebar;
And the Main component:
import React from 'react';
import { Route } from 'react-router-dom';
import { routes } from '../routes';

function Main() {
  return (
    <div style={{ flex: 1, padding: '10px' }}>
      {routes.map((route, index) => (
        // Render more <Route>s with the same paths as
        // above, but different components this time.
        <Route
          key={index}
          path={route.path}
          exact={route.exact}
          component={route.main}
        />
      ))}
    </div>
  );
}
export default Main;
Order of the paths in the object will be important if you are wrapping your routes in a Switch component.
React-Router v2
``` npm install —save react-router ```Allows us to use the "route" in the URL to go to different sets of components.
For example, http://myWebSite.com(http://mywebsite.com) is the root route "/" and http://myWebSite.com/firstRoute(http://mywebsite.com/firstRoute) would be another route.
The main Route component will be set up in the base or index.js code.
 In your base component (index.js) you will have something like this:
import React from 'react';
import ReactDOM from 'react-dom';
import { Provider } from 'react-redux';
import { createStore, applyMiddleware } from 'redux';
import { Router, browserHistory } from 'react-router';

import reducers from './reducers';
import routes from './routes';

const createStoreWithMiddleware = applyMiddleware()(createStore);
ReactDOM.render(
    <Provider store={createStoreWithMiddleware(reducers)}>
        <Router history={browserHistory} routes={routes}/>
    </Provider>
    , document.querySelector('.container'));
The above example also has redux, but you can see that the Router component has history and routes props. The history prop can take either "browserHistory", "hashHistory" and something else I can't remember. The browser history means that it will be looking for routes immediately after the /. The hash history will be looking for routes after a /#. You will also set up a routes.js files that will define all the routes.
    import React from 'react';
    import { Route, IndexRoute } from 'react-router';

    import App from './components/app';

    const Greeting = () => {
        return <div> Hit there </div>;
    };

    export default (
    <Route path="/" component={App}>
        <Route path="greet" component={Greeting} />
        <Route path="greet2" component={Greeting} />
        <Route path="greet3" component={Greeting} />
    </Route>
    );
You will not ever have a component in your routes.js file, however it is here to show how you can have children under the main component. The "/" path means that the App component will show as the root. Since the App ("/") route has children, the App will also show even when on the children routes. One other very important item you will need if you have a route with child components/routes, is a reference to the this.props.children prop in the parent component/route. This means that in the App component we need something like this:
import React, { Component } from 'react';

export default class App extends Component {
    render() {
        return (
            <div>
            Main App
            {this.props.children}
            </div>
        );
    }
}
This means that when you are at the root, you will only see "Main App", but when you go to "/greet", you will see "Main App" and the child component. Most of the time you will want to show your Main app component and another component when the root route is selected. To do this you will use the IndexRoute react-router component.
import React from 'react';
import { Route, IndexRoute } from 'react-router';

import App from './components/app';
import PostsIndex from './components/posts_index';

export default (
    <Route path="/" component={App}>
        <IndexRoute component={PostsIndex} />
        <Route path="greet" component={Greeting} />
        <Route path="greet2" component={Greeting} />
        <Route path="greet3" component={Greeting} />
    </Route>
);
Note that when "/greet" is chosen, you will no longer see the IndexRoute component.
Navigating To New Pages
When you want a user to be able to navigate to a new page via a link, you can use react routers Link component.
import React from 'react';
import { connect } from 'react-redux';
import { Link } from 'react-router';

class PostsIndex extends React.Component {
    render() {
        return (
            <div>
                <div className="text-xs-right">
                <Link to="posts/new" className="btn btn-primary"> Add Post </Link>
            </div>
                list of blog posts
            </div>
        );
    }
}
Many time you will want to programmatically go to a new route. This may be handled differently depending on the type of history you are using, but here are a few that I know of:
hashHistory.push('/todo');
Also, note, that if you are in a middleware function, you most likely will have a replace function as a parameter. This can be used to move to a new route. See Middleware Page(#RRM)
Using Context for Router Info
There are times when you will want to have Router information (like the push function) in a component that is far away from the Router component that encloses your app. You can use React Context for this. I'm not sure if it would be better to import something from react-router versus doing the following, but, whatever works.
class test extends React.Component {
//Must first declare that we want to receive context from React
    static contextTypes = {
        router: React.PropTypes.object
    }

    componentWillMount() {
    //using the router push method when component mounts
        if (something) {
            this.context.router.push('/');
        }
    }

    componentWillUpdate(nextProps) {
        //Need to check after the initial mount, so that when
        //component gets rerendered we know if we need to do something.
        if (nextProps.something) {
            this.context.router.push('/');
        }
    }
}
React-Router Middleware
Middleware allows you to do something before react-router does something. This example is for when you want to check if a user is logged in before taking them to a route:
//React Router middleware below.
var requireLogin = (nextState, replace, next) => {
    //firebase.auth().currentUser -> null means not logged in, else returns current user
    if (!firebase.auth().currentUser) {
        replace('/');
    }
        next();
    };

// <TodoApp />,
ReactDOM.render(
    <Provider store={store}>
        <Router history={hashHistory}>
            <Route path="/" component={Main}>
            <IndexRoute component={AppLogin} />
            <Route path="todo" component={TodoApp} onEnter={requireLogin} />
            </Route>
        </Router>
    </Provider>,
    document.getElementById('app')
);
The **requireLogin ** function is the middleware. We can inject this into any of react-router's routes. Here we are using it on the TodoApp components route. **onEnter=requireLogin ** is how we inject this middleware. Now anytime this route is called, first react-router will run the requireLogin() function.