
Firebase
Basics
To set up firebase in an application, you will first need to grab the configuration script from the firebase site. Note, this will be different for each Database you use.
When you are in your new database application area, click on the Overview menu option on the left and choose to get the configuration for the web.
var config = {
  apiKey: "AIzaSyBs7pnXGSlMYtin7tEtTijRYR_iBLRmz-A",
  authDomain: "expensify-e6b86.firebaseapp.com",
  databaseURL: "https://expensify-e6b86.firebaseio.com",
  projectId: "expensify-e6b86",
  storageBucket: "expensify-e6b86.appspot.com",
  messagingSenderId: "730922088689"
};
firebase.initializeApp(config);
.database() Functions
Once you have run the initializeApp function, passing it your "config" object, you will then have access to all of Firebase's capabilities.
One of the main capabilities that you will be using is the database functions. To access these database functions you will use:
var firebaseDB = firebase.database()
But most often you will want to get to the database reference. Do this as follows:
var firebaseRef = firebase.database().ref();
The above assumes you have imported firebase into your application and called it "firebase".
Note that the above "ref" is giving you access to your DB root. You can think of a ref() as a reference to a location in your database. It could be a table or a row.
You can now use firebaseRef to manipulate your database.
Your database is made up of nodes and to move around these nodes, you can use the .child() function. Here is a simple DB:
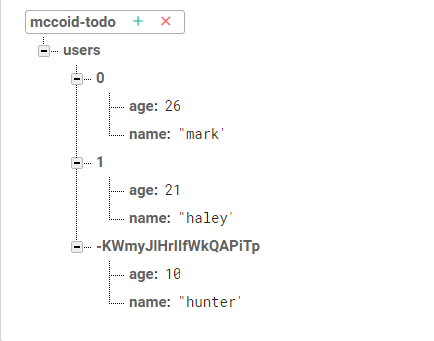
If I wanted to get a reference to the 0 entry above, I would do the following:
var fbRef = firebaseRef.child('users/0');
I can now run any command on the fbRef entry (set(), update(), remove(), etc.). I can also get the "key" for that array entry by:
consolelog(fbRef.key);
Note, that if you create an array by passing an array object, you will get the standard type index (0,1,2,...), if you use the push() command, you will get a firebase style key.
Last thing to remember is that you just about everything you do return a promise:
Keeping our Promises (and Callbacks)
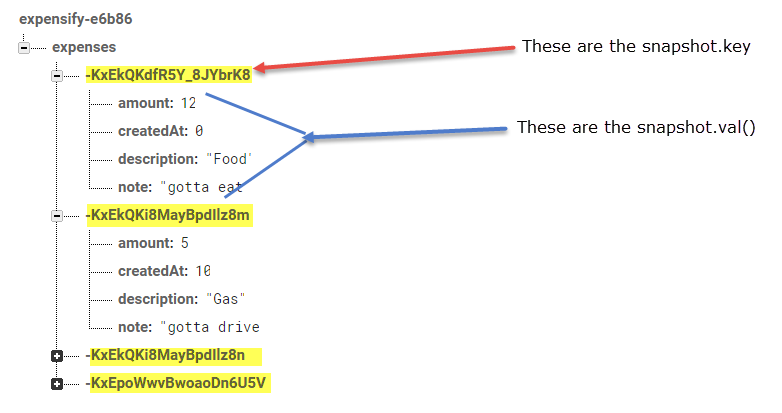
Arrays in Firebase
Arrays in firebase are handled by creating unique keys for each item in an array. Each item being an object, i.e. you can have more than one item in this array object.
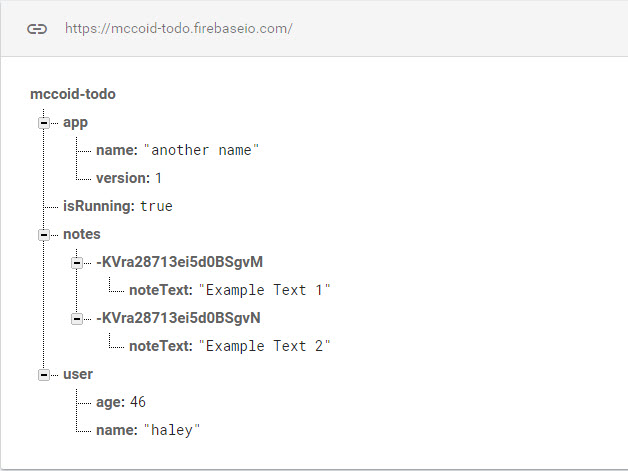
The push() firebase function adds one of these unique keyed objects to the node that you have a reference to. In the code below, we first push on item into the 'notes' node. Note we are saving a reference to this new node and in the next link use the set() function to add data to the new item.
In the next example, I am showing that you can chain the set to the push, however, you will not get a reference back to the new item.
var notesRef = firebaseRef.child('notes');

var newNoteRef = notesRef.push();
newNoteRef.set({
        noteText: 'Example Text 1'
});

notesRef.push().set({
        noteText: 'Example Text 2'
});
Since push is used so much, you can simplify this by sending the items value as an object passed to push.
var newNoteRef = notesRef.push({
        noteText: 'Example Text 1'
});

console.log(newNoteRef.key);
Here the newNoteRef is a reference to this new item and one of the properties of this class is the key of the new item. Note that the key is generated by firebase.
Important Note - There are no real arrays in firebase. If you send it an array, it will create an object with keys of 0...n. This versus push which creates a unique key for the object.
The BIG difference here, is that if you store ANYTHING in firebase with object key of integers, firebase will assume it is an array. Meaning that when you retrieve the data, it will return an array, filling in the empty keys with null. So, if you have keys of 1,3, 5, you will get back: [0, 1, 2, 3, 4, 5] with 0,2,4 having null values.
Adding/Updating Data/Deleting
First thing to understand when using the following firebase functions is that they are all asynchronous and return promises.
Set
Set will destroy and create. Meaning, if something exists at the node you are setting, it will be removed and then whatever set is creating will be created.
So, you can pass in anything you want, even a structure that is different. Just know that set is going to removed what was at the ref and replace it with the object you are sending in.
Set's promise does not return a value when it completes.
Update
Update will do exactly what it says, it will update whatever node you have a reference to. You do not have to pass all of the items in the node, just the ones that you want to update.

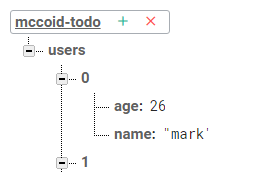
If I want to update the age of the above entry, there are a couple of ways:
//update all in one go:
firebaseRef.child('users/0').update({age: 46});

//this way will get reference first:
var updRef = firebaseRef.child('users/0');
updRef.update({age: 46});
If you run an update and no item exists to update, it will be created.
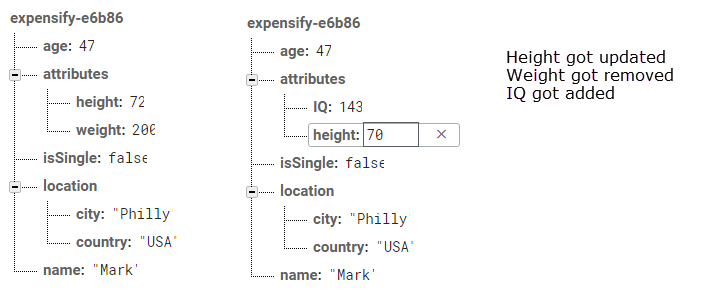
If you want to remove a piece of data with an update, pass null as the updated value. Want to add data that doesn't exist in ref, just include it in object. Want to update an existing piece of data, just include it.
//A call to update, can Update, Remove (by passing null) and Add
firebase.database().ref('attributes')
  .update({
    height: 70,
    IQ: 143,
    weight: null
  });
Below are the before and after snapshots of the database after the above update.
What if I wanted to perform the same updates as above, but also change the age property using only one update.
This can be done, but you first must understand that you cannot directory update nested objects.
firebase.database().ref().update({
    age: 35,
    attributes: {
        IQ:143
    }
})
The above would make the attributes property equal to only the IQ property. To do this, you need to use a bit of odd syntax:
firebase.database().ref().update({
  age: 35,
  'attributes/IQ': 143,
  'attributes/height': 70,
  'attributes/weight': null,
});
Delete data (Remove)
remove(onComplete) returns firebase.Promise containing void
Removes the data at this Database location.
Any data at child locations will also be deleted.
The effect of the remove will be visible immediately and the corresponding event 'value' will be triggered. Synchronization of the remove to the Firebase servers will also be started, and the returned Promise will resolve when complete. If provided, the onComplete callback will be called asynchronously after synchronization has finished.
var fbRef = firebase.database().ref('users/ada');
fbRef.remove()
    .then(function() {
        console.log("Remove succeeded.")
    })
    .catch(function(error) {
        console.log("Remove failed: " + error.message)
    });
Retrieving Data
.once() call
You can get data from a reference one time using the once function:
const database = firebase.database();
database.ref().once('value')
    .then((snapshot) => {
        //Get the data from the snapshot
        const data = snapshot.val();
    })
    .catch((e) => {
        //Error Code
    })
Get more information on the snapshot parameter: Snapshot Documentation
You can use the forEach firebase snapshot method to take firebase's object like representation of data and transform to an array when reading it in:
const database = firebase.database();

database.ref('expenses').once('value')
  .then((snapshot) => {
    console.log(snapshot.val());
    // Create Array to hold return from  DB
    const expenses = [];
    // Use the firebase forEach method to push the children into our array
    snapshot.forEach((childSnapshot) => {
      expenses.push({
        id: childSnapshot.key, // .key will be the key for child
        ...childSnapshot.val()
      });
    });
  });
Listening for Changes - on
You can subscribe to changes in the database by using the on function as follows:
firebase.initializeApp(config);
const database = firebase.database();
//When subscribing to changes, you will get the callback function returned.
//Store this in a variable and you will be able to use it to turn off just
//that single subscription.
const onValueChange = database.ref()
  .on('value', (snapshot) => {
    const val = snapshot.val();
    //-- Do something with data
  }, (e) => {
      console.log('this is an error message', e);
  });

//This will turn off listening for all listeners
database.ref().off();

//Turn off a single subscription
database.ref().off(onValueChange);
This callback will be executed whenever anything is changed in the database.
You can also listen for changes on specific "nodes"/refs. Like database.ref('notes').on(...)
Other "on" Events
There are other events that you can listen to with on. Things like when a child is removed 'child_removed' or when a child is changed 'child_changed' or when a child is added 'child_added'.
You listen for additions to the "array" using the on() function with 'child_added'
var notesRef = firebaseRef.child('notes');

notesRef.on('child_added', (snapshot) => {
    console.log('child added:', snapshot.key, snapshot.val());
});
The on() listener can also look for child_removed and child_changed
User Management and Authorization
Manage Users in Firebase | Firebase
NOTE: Once you deploy to a URL other than localhost, you will need to got into the Authentication section and add the url where the application lives.
Authentication Rules
These rules define who can see what parts of your data tree.
Here is a basic usage with the assumption that we are authenticating through firebase:
{
  "rules": {
    ".read": false,
    ".write": false,
      "users": {
        "$uid": {
          ".write": "$uid === auth.uid",
          ".read": "$uid === auth.uid"
        }
      }
    }
}
There is much more that we can do in our authentication section. We can further limit what the users can write to the database. Once we know our structure, we can add these items.
For example, if we had a structure where our application wrote a single object (the expenses object) to the database, we could lock it down like this:
{
  "rules": {
    ".read": false,
    ".write": false,
    "users": {
      "$user_id": {
        ".read": "$user_id === auth.uid",
        ".write": "$user_id === auth.uid",
      "expenses": {
          ".validate": true
      },
      "$other": {
          ".validate": false
        }
      }
    }
  }
}
In the above example, users would only be able to write to the expenses "section" of the database. The "$other" variable would catch any other reads or writes and invalidate them.
You can take it one step further and lock down the specific fields you are going to write:
{
  "rules": {
    ".read": false,
    ".write": false,
    "users": {
      "$user_id": {
        ".read": "$user_id === auth.uid",
        ".write": "$user_id === auth.uid",
      "expenses": {
        "$expense_id": {
                    ".validate": "newData.hasChildren(['description', 'note', 'createdAt', 'amount'])",
          "description": {
            ".validate": "newData.isString() && newData.val().length > 0"
          },
          "note": {
            ".validate": "newData.isString()"
          },
          "createdAt": {
            ".validate": "newData.isNumber()"
          },
          "amount": {
            ".validate": "newData.isNumber()"
          },
          "$other": {
            ".validate": false
          }
        }
      },
      "$other": {
          ".validate": false
        }
      }
    }
  }
}
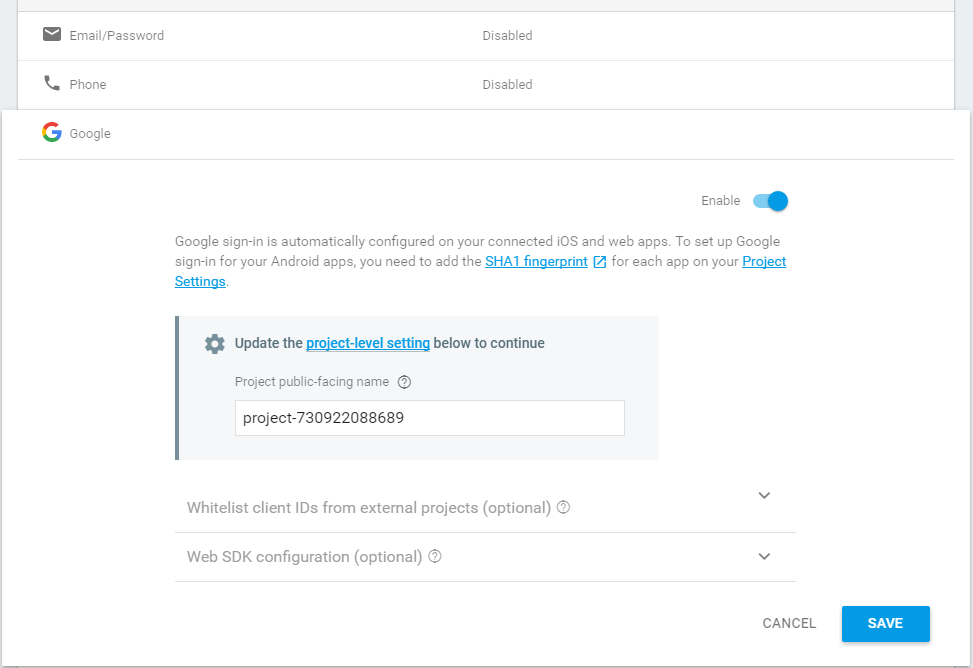
Auth Provider
To setup your app to use firebase as the authenticator, you will need to first log into your firebase console and go to the DB you are working with, Authentication section and then choose your sign in method.
We will review the Google provider here.
To start, simply enable the google provider and click save
Next, you will need to define your "googleProvider" variable, usually added to your firebase configuration file:
//firebase.js
import * as firebase from 'firebase';

const config = {
  ...
}
firebase.initializeApp(config);
const database = firebase.database();

//!!Here we are defining our googleProvider
const googleAuthProvider = new firebase.auth.GoogleAuthProvider();

export { firebase, googleAuthProvider, database as default };
Checking State of Login
i.e. Is the user logged in
You can use the following snippet to setup a function that will be called whenever the state of the firebase Auth has changed:
firebase.auth().onAuthStateChanged((user) => {
  if (user) {
    console.log(`logged in as ${user.uid}`);
  } else {
    console.log(`logged out`);
  }
});
More User Auth
First and foremost, see the Firebase Docs to make sure you have the correct Authentication Rules set up and that you have set up a way for your user to "Login" to your application.
Setup App.js onAuthStateChanged
Once you have this set up, you will probably have the root of your app "/" be your login in page. After the user logs in you will need to redirect him. This can be accomplished in the app.js or root js file for your application.
import React ...
...
import AppRouter, { history } from './routers/AppRouter';
import { firebase } from './firebase/firebase';
...

const jsx = (
  <Provider store={store}>
    <AppRouter />
  </Provider>
);
let hasRendered = false;
const renderApp = () => {
  if (!hasRendered) {
    ReactDOM.render(jsx, document.getElementById('app'));
    hasRendered = true;
  }
};

firebase.auth().onAuthStateChanged((user) => {
  if (user) {
    console.log(`logged in as ${user.uid}`);
    store.dispatch(expenseActions.startSetExpenses()).then(() => {
      renderApp();
      if (history.location.pathname === '/') {
        history.push('/dashboard');
      }
    });
  } else {
    renderApp();
    history.push('/');
  }
});
Flow of User Authentication in App
The flow of this, will be a user comes to your site and is presented with the login page. They go through the login process and once logged in the following happens:
- Redux action is dispatched to update user.uid in the redux store.
- Any initial data is fetched
- User is redirected to page
- Make Private pages. There will be pages that cannot be viewed unless logged in. Make sure these pages are locked down.
- Make Public pages. There will be pages that are public but shouldn't be seen once logged in. Like the login page.
Here is an example set of action creators for the login and logout actions. Note, that we need to enhance this for error catching and use of multiple auth providers (at least email).
import { firebase, googleAuthProvider } from '../firebase/firebase';

export const login = uid => ({
  type: 'LOGIN',
  uid
});

export const startLogin = () => {
  return (dispatch) => {
    return firebase.auth().signInWithPopup(googleAuthProvider);
  };
};

export const logout = () => ({
  type: 'LOGOUT'
});
export const startLogout = () => {
  return (dispatch) => {
    firebase.auth().signOut();
  };
};
Here is the auth reducer:
export default (state = {}, action) => {
  switch (action.type) {
    case 'LOGIN':
      return {
        uid: action.uid
      };
    case 'LOGOUT':
      return {};
    default:
      return state;
  }
}
Make Private and Public Pages
Probably a couple of ways to do this. One would be an HOC which would check to see if the user was logged in and would either return the passed in Component if logged in or redirect back to the Login page.
The other way is to create a component that encapsulates React Routers Route component.
Here is our AppRoute.js file:
import React from 'react';
import { Router, Route, Switch } from 'react-router-dom';
import createHistory from 'history/createBrowserHistory';

import Login from '../components/Login';
import ExpenseDashboardPage from '../components/ExpenseDashboardPage';
import EditExpensePage from '../components/EditExpensePage';
import AddExpensePage from '../components/AddExpensePage';
import HelpPage from '../components/HelpPage';
import NotFound from '../components/NotFound';
import PrivateRoute from './PrivateRoute';

export const history = createHistory();

const AppRouter = () => (
  <Router history={history}>
    <div>
      <Switch>
        <Route exact path="/" component={Login} />
        <PrivateRoute path="/dashboard" component={ExpenseDashboardPage} />
        <PrivateRoute path="/create" component={AddExpensePage} />
        <PrivateRoute path="/edit/:id" component={EditExpensePage} />
        <Route path="/help" component={HelpPage} />
        <Route component={NotFound} />
      </Switch>
    </div>
  </Router>
);

export default AppRouter;
Here is the PrivateRoute component that does the work. It connects to the redux store and determines if the user is logged in. If they are then it returns a Route component setup properly. If not logged in, then it redirects to the login page, which is "/" in this example.
import React from 'react';
import { connect } from 'react-redux';
import { Route, Redirect } from 'react-router-dom';
import Header from '../components/Header';

//Destructure the props, get isAuthenticated from redux connect
//Grab the component renaming to Component so that React sees it as a component
//then use the rest operator to grab the rest of the props
export const PrivateRoute = ({
  isAuthenticated,
  component: Component,
  ...rest
}) => (
  <Route
    {...rest}
    component={props => (
      isAuthenticated ? (
        [<Header />,
          <Component {...props} />
        ]
      ) : (
        <Redirect to="/" />
      )
    )
  }
  />
);

const mapStateToProps = state => ({
  isAuthenticated: !!state.auth.uid
});

export default connect(mapStateToProps)(PrivateRoute);
You can do the same thing if you want to have some pages not able to be navigated to when logged in. We could call this implementation the PublicRoute:
import React from 'react';
import { connect } from 'react-redux';
import { Route, Redirect } from 'react-router-dom';

export const PublicRoute = ({
  isAuthenticated,
  component: Component,
  ...rest
}) => (
  <Route
    {...rest}
    component={props => (
      !isAuthenticated ? (
        <Component {...props} />
      ) : (
        <Redirect to="/dashboard" />
      )
    )
  }
  />
);

const mapStateToProps = state => ({
  isAuthenticated: !!state.auth.uid
});

export default connect(mapStateToProps)(PublicRoute);
Accessing only Logged in User Area in Firebase
You can handle this in your Action Creators since you will be using a thunk. The thunk's signature is (dispatch, getState). So you will have access to the state:
export const startAddExpense = (expenseData = {}) => {
  return (dispatch, getState) => {
    //Get the uid from the store
    const { uid } = getState().auth;
    const {
      description,
      note,
      amount,
      createdAt
    } = expenseData;
    const expense = { description, note, amount, createdAt, };
    //Use the uid to access the correct users expenses
    return database.ref(`users/${uid}/expenses`).push(expense)
      .then((ref) => {
        dispatch(addExpense({
          id: ref.key,
          ...expense
        }));
      });
  };
};