
Server Config and SSH
Resources
Fail2Ban - For production server, this will ban people who try and fail to login x number of times.
Explain Shell - Great for explaining what linux command are doing given the options being used.
Setting up SSH keys on a Mac.
Go to the SSH Directory and if it doesn't exist, create it.
$ cd ~/.ssh
# If this directory doesn't exist, then create it (the -p says to make if it doesn't exist)
$ mkdir -p ~/.ssh
Next, you will need to create your keys by running ssh-keygen
$ ssh-keygen
# you will be prompted for a name and an optional passphrase
This will create two files in your ssh directory. For example, if you named your key mykey then you would have the following in your directory:
mykey
mykey.pub
The .pub is your public key. This is the one that goes on your server.
Setting up SSH Keys on Windows
Pretty much the same as above, but use powershell
You keys will be located in your user directory .ssh
You can use Powershell to ssh into your server.
Setting up Multiple SSH Keys
If you have multiple server and you want each to have it's own SSH key, you can do the following:
Create the SSH Key on the target machine (i.e. the client that is going to be logging into the server)
Copy the public key to a machine that has access to the server.
Append the public key data to the ~/.ssh/authorized_keys files
$ echo "ssh-rsa AAAAB3NzaC1yc2EAAAADAQABAAABAQDLxXZr2gVHgwdnhi05D9VxDEVjHcFLr4NZ7WaayV9uQgOD9qXxSjyZNr5oMzyr4z1dOZRzf+CnoLZgM4wZ11IJ9hKZoOMchPUjRw5qwLJPbS/z1Kk3vGrRgjI2kA5kPi1l0P5E84RwGA+fil+qUTgj2IaYxc97C8DzTWHCg37oXSVz8gnKMrU633OLUeIp9JuoA+TEPn7KLKYy98I2m62mvnHOoXn7vRIqyMuHtTne/zHNjCkNWWuNURLGw1wpaPGBMeRLgvi0ZLz2bj2TrbFfWqHL+yJpMCD7wXjlYOs5lHFRRkUlDvjh3GHfPzKp7vmJ3+xml2R9a1BNwlEBWstx markm@DESKTOP-HR5U3AQ" >> ~/.ssh/authorized_keys
Not sure if the permissions stuff is needed.
Once the authorized_keys file contains the public key, you need to update permissions on some of the files. The ~/.ssh directory and authorized_keys file must have specific restricted permissions (700 for ~/.ssh and 600 for authorized_keys). If they don't, you won't be able to log in.
Make sure the permissions and ownership of the files are correct.
$ chmod -R go= ~/.ssh
$ chown -R $USER:$USER ~/.ssh
Using Dropbox to Transfer Key
If you need to get you public key over to the server, you can save in a dropbox file, then get the dropbox link and use the following on the server:
$ curl -L -o filename https://www.dropbox.com/s/pvtgi666ysdcrtt/pubrsa.txt?dl=1
Make sure to change the dl=0 to dl=1
Once the file is downloaded, you can add to the authorized_keys file:
$ cat filename >> ~/.ssh/authorized_keys
Logging into your server via SSH
When you set up your server, you will be prompted for the SSH key to use
# substitute your ip address
$ ssh root@100.100.100.100

# This will most likely deny you access since it doesn't know which key to check
$ ssh -i mykey root@100.100.100.100
Since you don't want to have to type the -i mykey every time, you need to create a config file in your ssh directory with the following.
# first cd into the ssh directory
$ cd ~/.ssh
$ vi config

# Enter the following into the config file and save
Host *
 AddKeysToAgent yes
 UseKeychain yes
To manually add to the keychain use the command below.
NOTE: you don't need to do this if your config file has the above lines.
ssh-add -K ~/.ssh/mykey
Updating your Server
To update the software on your server do the following:
$ apt update
$ apt upgrade
Add New User
Once you update your software you should create a new user so that you DO NOT login as root.
We will be creating doing the following:
- Create a New User
- Give that user super user rights
- create an .ssh directory and copy public key over
- disable root access
# Create a User on your server
$ adduser username

# Give user "sudo" rights (Super User DO)
# you are saying "add username to the super users group"
$ usermod -aG sudo username

# now login as your new user using su (Switch User)
# don't think you will be asked for password,
$ su username

# Check sudo access - This is the auth.log and contains information about happenings on your server
$ sudo cat /var/log/auth.log

# Make sure you are in your root and then make the .ssh directory
$ cd ~
$ mkdir -p ~/.ssh

# Create a new authorized_keys file and copy your public key into it.
# See above for where that key is located on your current machine (NOT Server, but the machine you are
# accessing your server from)
$ vi ~/.ssh/authorized_keys

# You can use the cat command to list the contents of your key.pub file to copy to vi
# i = insert mode
# esc = back out of insert mode
#:wq = write and then quit
Logging In as New User and Disable Root
# Exit from the server as you were logged in as root
# ssh as your new username
$ ssh username@100.55.55.55

# You now should change file permissions on authroized_keys
$ chmod 644 ~/.ssh/authorized_keys

# DISABLE ROOT
# Do this by modifying your ssh daemon config file
# Find "Permit Root Login" and change "yes" to "no"
# See above for vi commands
$ sudo vi /etc/ssh/sshd_config

# must restart ssh daemon for changes to go into effect
$ sudo service sshd restart
Security
Disable Root access! See above.
You can view the logs of who is trying to gain access to your server:
# Check sudo access - This is the auth.log and contains information about happenings on your server
$ sudo cat /var/log/auth.log
Keys ways to secure a server:
- SSH - use instead of passwords
- Firewalls -
- Updates - Keep your software up to date.
- Two Factor Authentication
- VPN
Updates
This software will keep you applications updated.
# Install unattended upgrades
$ sudo apt install unattended-upgrades

# view Conf File
$ cat /etc/apt/apt.conf.d/50unattended-upgrades
Ports
nmap is a port scanner. You will most likely need to install it first:
# Install nmpa
$ sudo apt install nmap

# The manual
$ man nmap

# Run nmap
$ nmap YOUR_SERVER_IP

# Run showing more info
$ nmap -sV YOUR_SERVER_IP
If you are running a nodejs server, for example an application created using ExpressJS, than most likely you will also see port 3000 or whatever port you are running that server on.
You should close this port as Nginx will be redirecting traffic to this app.
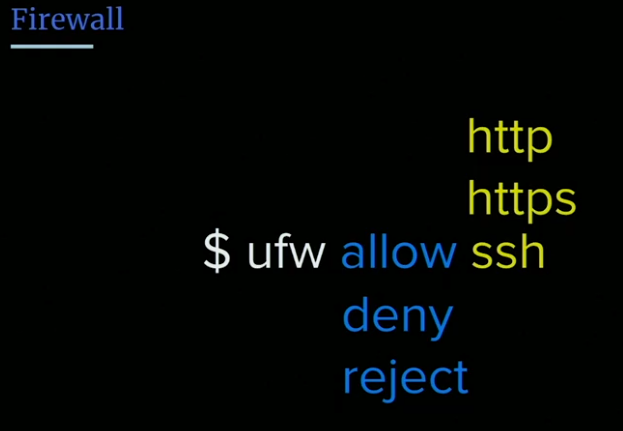
Firewall
A simple firewall is ufw. It allows you to think in services rather than ports.
Deny vs Reject
If you deny a request, you black hole it, meaning you don't respond to say, hey this port isn't open. Whereas reject will send a packet back saying, hey this port port isn't open.
Most of the time you will want to deny
Here are its basic commands:
# Check to see if ufw is active
$ sudo ufw status

# Enable it if not enabled
$ sudo ufw enable

# Make sure to Enable SSH/http
$ sudo ufw allow ssh
$ sudo ufw allow http
Permissions
You have three things you can do to a file read, write and execute.
We use sudo (super user) when our user doesn't have those rights.
ls -la in a directory will show you the permissions on files.
You will see something that looks like this:
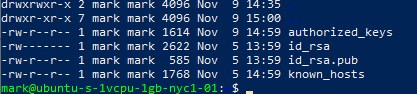
The first character designates is as a directory or not, the next 3 groups of 3 are read,write,execute for the current user, my group (sudo), everyone else.
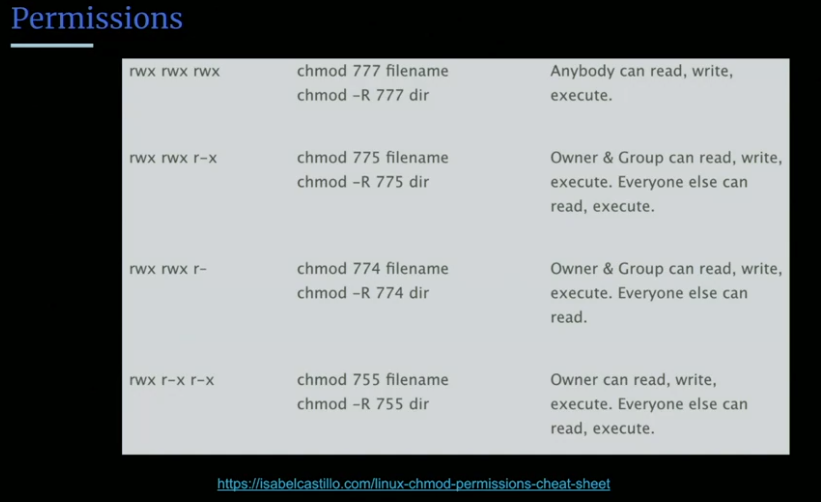
chmod is the command to change the permissions on a file. it isn't super intuitive. Here are common examples and cheat sheet:
Set the permissions for a file or directory by using the chmod command. Each row has 2 examples, one for setting that permission for a file, and one for a directory named ‘dir’. This works in any linux distro, such as Ubuntu, etc.
| Permission | Command Examples | Description |
|---|---|---|
| rwx rwx rwx | chmod 777 filename chmod -R 777 dir | Anybody can read, write, execute. |
| rwx rwx r-x | chmod 775 filename chmod -R 775 dir | Owner & Group can read, write, execute. Everyone else can read, execute. |
| rwx rwx r– | chmod 774 filename chmod -R 774 dir | Owner & Group can read, write, execute. Everyone else can read. |
| rwx r-x r-x | chmod 755 filename chmod -R 755 dir | Owner can read, write, execute. Everyone else can read, execute. |
| rwx — — | chmod 700 filename chmod -R 700 dir | Owner can read, write, execute. No one else has any rights. |
| rw- rw- rw- | chmod 666 filename chmod -R 666 dir | Everyone can read, write. |
| rw- rw- r– | chmod 664 filename chmod -R 664 dir | Owner & Group can read, write. Everyone else can read. |
| rw- r– r– | chmod 644 filename chmod -R 644 dir | Owner can read, write. Everyone else can read. |
Nginx / NodeJS
Nginx is a webserver. Like Apache, but works well with node.
First you must install the software.
# Install Nginx
$ sudo apt install nginx

# Start the Nginx service
$ sudo service nginx start
Now, if you go to the website IP or domain that you have setup on this server, it will open up the default index page, which is index.nginx-debian.html. It is located in /var/www/html/
Nginx Configuration
The Nginx configuration file is located in /etc/nginx/sites-available/default
You can use less to view or vi to edit this file. You will need to sudo to view most likely.
location block
The location block in the configuration file tells how the server will serve files. It will look through the ones listed on the first line, index, index.html, etc. That is what the try_files directive is telling it to do. If all else fails, it displays a 404 error.
# Add index.php to the list if you are using PHP
index index.html index.htm index.nginx-debian.html;

server_name _;

location / {
  # First attempt to serve request as file, then
  # as directory, then fall back to displaying a 404.
  try_files $uri $uri/ =404;
}
You will notice that the try_files directive will look through the list of index files and display the first one it finds. When installing Nginx, it creates the index.nginx-debian.html file.
If you create an index.html, it will serve that one instead.
$ sudo vi /var/www/html/index.html
NodeJS
Install nodeJS:
# Install NodeJS and npm
$ sudo apt install nodejs npm

# Install it
$ sudo apt install git
The Nginx /var/www directory can only be accessed by using sudo at this point. We don't want to have to do this every time so we will use the chown command (Change Ownership).
The next block will change ownership of the /var/www directory and then we will start creating directories for an application that will run on the server. Note, this is for a Front End masters course.
# the -R is so command is Recursive
# $USER is the current user you are logged in as (I think)
# You can use echo $USER to see "who" $USER is
# You could probably replace the $USER with your username
$ sudo chown -R $USER:$USER /var/www

# Make app directory for your applications
$ mkdir /var/www/app

# Move into that directory and initial a git repo
$ cd /var/www/app && git init

# Create directory structure - assumes we are in /var/www/app
$ mkdir -p ui/js ui/html ui/css

# Create an empty app.js file in the app dir and initialize the directory.
$ touch app.js
$ npm init

# Install Express
$ npm i express --save
Simple Express Server
Now update app.js with the following code.
const express = require('express');
const app = express();
const port = 3000;

app.get('/', (req, res) => {
  res.send('Hello World');
});

app.listen(port, () => console.log('Example app listening on port ${port}'));
Now, if you run the node app above node app.js you can reach it by going to mccoidco.com:3000
Since we don't want to have people type the port, we are not going to go back into the Nginx configuration to set up a proxy pass.
Proxy pass means that we are going to take traffic coming in and pass it somewhere else.
# edit the Nginx configuration and add the proxy pass
$ sudo vi /etc/nginx/sites-available/default

# You will replace the location code block with this:
location / {
  proxy_pass http://127.0.0.1:3000/;
}

# restart your server for config to take effect
$ sudo service nginx reload
Process Manager
A process manager keeps your
- application running
- Handles errors and restarts
- Can handle loggin and clustering
The package manager is a npm module and we want to install it globally, as you may want it to access multiple applications.
# PM2 is the Process Manager we will use
$ sudo npm i -g pm2

# Start PM2
$ pm2 start app.js

# setup auto restart
# This will give you a command that you will copy and paste into your terminal on the server
$ pm2 startup

# To see what PM2 is managing run
$ pm2 status
NOTE 1 : When upgrading to newer Node.js version, update the PM2 startup script! Use pm2 unstartup first then pm2 startup again.
git setup
Since you have an application on your server, you will want to be able to pull from git when new updates are available.
Here are the steps:
Create ssh keys on your server
$ cd ~/.ssh
$ ssh-keygen
# You can just create the default id_rsa.pub keys
# copy to github ssh keys
$ cat id_rsa.pub
Add the public key to GitHub
Set the Global github config file for username and email. This way if you ever push from this machine, you will know where it came from.
$ git config --global user.name "Your Name"
$ git config --global user.email "youremail@yourdomain.com"
Add the remote for the GitHub repo to your App directory. The important thing here, is to grab the ssh version and NOT the html version.

Then you will take this and add it as a remote, if you have already initialized the "app" directory on your server. OR if you haven't initialized, you can use the
git clonecommand.$ git clone git@github.com:markmccoid/FullStack.git # if you have already initialized a blank repo, you can just run below # if you cloned from above, I think you still need to run the line below. $ git remote add origin git@github.com:markmccoid/FullStack.git # Check to make sure remote is setup $ git remote -v
Upgrade Node
You can use update scripts from nodesource.com. To see the available distributions go to:
# Download setup script from nodesource pipe it to bash to run
# this script resets needed pointer so that next step works.
$ curl -sL https://deb.nodesource.com/setup_14.x | sudo -E bash

# Above script has reset nodejs pointers so that when we run apt-get install, it installs the
# version given above
# NOTE: apt-get is an outdated version of apt, but it still works
$ sudo apt-get install -y nodejs
Another option to do the same.
# Download setup script from nodesource and save script (-o ...)
# this script resets needed pointer so that next step works.
$ curl -sL https://deb.nodesource.com/setup_14.x -o nodesource_setup.sh

# Run script
$ sudo bash nodesource_setup.sh

# Above script has reset nodejs pointers so that when we run apt-get install, it installs the
# version given above
$ sudo apt install nodejs
Update Global Packages
Since you may have installed some global packages with npm, you can also update all of these using:
$ sudo bpm update -g
Nginx Configuration
Redirects
- 301 is a permanent redirect
- 302 is a temporary redirect
You can edit your Nginx configuration to redirect to another URL based on the current URL:
location /help {
  return 301 https://developer.mozilla.org/en-US/;
}
Subdomains
server {
    listen 80;
    listen [::]80; # IPV6 notation
    server_name movietracker.mccoidco.com

    location / {
        proxy_pass: http://localhost:3000
    }
}
Compression
Nginx will compress using gzip on all data going out. It is on by default.
Setting up HTTPS / HTTP2
You can get a free certificate from:
Enter what software (Nginx) and OS you are using and then follow the instructions!
After following the instructions and modifying Nginx configuration, it will have redirected your traffic to port 443, BUT we have a firewall in place and are not allowing traffic on this port, so we must now open it up!
Firewall Open port 443
$ sudo ufw allow https
HTTP2
http2 is the next iteration of HTTP, it requires that HTTPS is setup on your website and allows then for less "handshakes".
To set it up, you will modify your Nginx configuration as follows:
$ sudo vi /etc/nginx/sites-available/default

# Modify the listen 443 line:
listen 443 http2 ssl;

# Restart Nginx
$ sudo service nginx restart
Web Sockets
To use Web Sockets with Nginx, you will need to add the following location block.
$ sudo vi /etc/nginx/site-available/default

location / {
  proxy_set_header Upgrade $http_upgrade;
  proxy_set_header Connection "upgrade";

  proxy_pass http: //127.0.0.1:3000
}
Common Linux Tools
find - will find either files or directories.
grep - looks inside files
ps aux - shows processes running
$ ps aux | grep node- see if node is runninghtop - Tells us what is running and resources being taken. Will need to install
$ sudo apt install htop
Configuring a Domain
To use a domain you own on your server, you will first have to add the domain to the service that is hosting your server.
In the case of DigitalOcean, simply add the domain (don't have a screenshot of where, but figure it out).
Then it will ask you to Create New Records. Right now, you only need to create A records.
To create one for yourdomainname.com use the @ sign for the Hostname and then the server to direct it to.
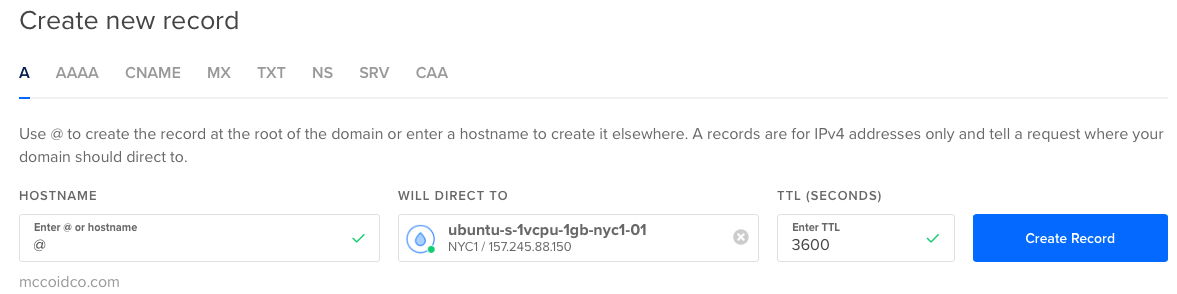
Then do the same with www for the Hostname.
You should also see the Nameservers for the site that is hosting your server. Make sure to update these with the site that has your domain name.