Electron Basics
I like to think of an Electron application as have two pieces, just like a web application.
- The Backend Server - this is the Electron process
- The Web App - this is the UI
These two processes cannot directly communicate. You will need to use the IPC to communicate.
Think of the Electron process (backend server) as being the piece that will handle most file system interactions.
Note: You may want to use the HTML5 <input type="file" accept="video/*"> to show a file picker. The accept property can handle multiple types.
I am thinking that it would be best to create an "Interface" set of functions that deal with the IPC communication so that if we port to a web app, this is the main piece that would need to change. On the web, this "Interface" set of functions will now be connecting to the server.
Project Setup
Nothing to crazy, here. Create your directory, npm init and then install electron npm install --save electron.
npm init
npm install --save electron
Make sure to setup a script in package.json to use to start electron:
"scripts": {
    "electron": "electron ."
  },
Boiler Plate Code
You need some basic files to get you started.
In the root of the project directory, you will have your package.json plus:
- index.js - This is your Electron process (i.e. the backend server analogy)
- main.html - Doesn't have to be named main, but this will be the html file that will be loaded into the browser window instance that our index.js electron process will create.
NOTE: - in your main.html or index.html make sure to set the
Here is the basic index.js code:
const electron = require('electron');

const { app, BrowserWindow } = electron;  //destruction off the electron object

let mainWindow;

app.on('ready', () => {
  mainWindow = new BrowserWindow({});
  mainWindow.loadURL(`file://${__dirname}/main.html`);
})
Note, that we are declaring mainWindow outside of the app.on listener because of scoping within the callback. Meaning, we will want to have access to this mainWindow variable in other parts of our code, not just in the listener callback.
BrowserWindow Config Object
The BrowserWindow function can have a config object passed to it. Here are some basic settings:
mainwWindow = new BrowserWindow({
  width: 300, //in pixels
  height: 500, //in pixels
  frame: false, //title bar of app (i.e. one with minimize, maximize, etc)
  resizable: false, //do not allow resizeing of window
  show: false //show window on startup or don't
})
Determining Which Windows or Mac platform
There will be times when we need to know if we are running on Windows or Mac. We can find this out by looking at the process.platform environment variable.
- Windows will be win32
- Mac will be darwin
- Other options - freebsd, linux, sunos
Can do something like:
let something = process.platform === 'win32' ? 'windows stuff' : 'mac/other stuff';
Tray Icons / Apps
You can also create apps that have an icon in the Windows tray or Mac top bar. To do this you will need to use the Tray class from electron:
const { app, BrowserWindow, Tray } = electron;

app.on('ready', () => {
  //get an icon -- windows needs to have a background, mac is transparent
  const iconName = process.platform === 'win32' ? 'windows-icon.png' : 'iconTemplate.png';
  const iconPath = path.join(__dirname, `./src/assets/${iconName}`);
  //Instantiate a new tray object passing in the icon
  tray = new Tray(iconPath);
  tray.on('click', (event, bounds) => {
  if(mainWindow.isVisible()) {
    mainWindow.hide()
  } else {
    mainWindow.show();
  }
});
...
});
We can then define an .on 'click' event listener for the tray object. Note, that the tray.on() callback function accepts the event object and the bounds object.
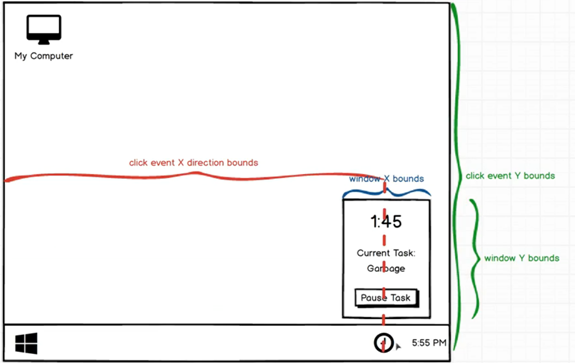
bounds object
The bounds object will help us determine the position of our window.
In the case of the tray 'click' event, it tells us where we clicked. Not the exact 'x,y', but the center of the icon we clicked on.
There is also a "window" bounds object. We can use both of these to position our window where we want.

Menus
Menu API Docs Basic code to add a Menu to our application:
const electron = require('electron');

const { app, BrowserWindow, Menu } = electron;  //destruction off the electron object

let mainWindow;

app.on('ready', () => {
  mainWindow = new BrowserWindow({});
  mainWindow.loadURL(`file://${__dirname}/main.html`);

  const mainMenu = Menu.buildFromTemplate(menuTemplate);
  Menu.setApplicationMenu(mainMenu);
});

const menuTemplate = [
  {
    label: 'File'
  }
];
You can see that we are creating a menuTemplate, which is an array of objects defining what menu items we want to show. One thing to note is that when we apply our menu via Menu.setApplicationMenu, we REMOVE all default menu items and key bindings. So ctrl-r, won't reload and we can't get to the developer console, etc.
Menu Templates
The menu template is an array of objects, with each first level object being a top-level menu item. You can also define sub-menus, which are then an array of objects defining the menu items under the menu item it is defined under:
const menuTemplate = [
  {
    label: 'File',
    submenu: [
      {
        label: 'New Todo'
      }
    ]
  }
];
Cross Platform Menu Issue - You will find that on Mac machines, it makes the first menu item part of the "system" menu, so for macs you need to enter a blank object for the first item in the menuTemplate to account for this. Luckily, since electron is based on node, we have access to node's process.platform function. This will return either "darwin" for mac or "win32" for windows. So, we can update our code to take this into account:
const menuTemplate = [
  {
    label: 'File',
    submenu: [
      {
        label: 'New Todo'
      },
      {
        label: 'Quit',
        accelerator: (() => {
          if (process.platform === 'darwin') {
            return 'Command+Q';
          } else {
            return 'Ctrl+Q';
          }
        })(),
        click() {
          app.quit();
        }
      }
    ]
  }
];

if (process.platform === 'darwin') {
  menuTemplate.unshift({});
}
Note that we have used the process.platform variable to also help us in setting up the menu accelerator key options.
Roles
Certain menu commands can be accessed using the role property. The role sets up the label, accelerator and click():
const template = [
  {
    label: 'Edit',
    submenu: [
      {role: 'undo'},
      {role: 'redo'},
      {type: 'separator'},
      {role: 'cut'},
      {role: 'copy'},
      {role: 'paste'},
      {role: 'pasteandmatchstyle'},
      {role: 'delete'},
      {role: 'selectall'}
    ]
  },
  {
    label: 'View',
    submenu: [
      {role: 'reload'},
      {role: 'forcereload'},
      {role: 'toggledevtools'},
      {type: 'separator'},
      {role: 'resetzoom'},
      {role: 'zoomin'},
      {role: 'zoomout'},
      {type: 'separator'},
      {role: 'togglefullscreen'}
    ]
  },
  {
    role: 'window',
    submenu: [
      {role: 'minimize'},
      {role: 'close'}
    ]
  },
  {
    role: 'help',
    submenu: [
      {
        label: 'Learn More',
        click () { require('electron').shell.openExternal('https://electron.atom.io') }
      }
    ]
  }
]

if (process.platform === 'darwin') {
  template.unshift({
    label: app.getName(),
    submenu: [
      {role: 'about'},
      {type: 'separator'},
      {role: 'services', submenu: []},
      {type: 'separator'},
      {role: 'hide'},
      {role: 'hideothers'},
      {role: 'unhide'},
      {type: 'separator'},
      {role: 'quit'}
    ]
  })

  // Edit menu
  template[1].submenu.push(
    {type: 'separator'},
    {
      label: 'Speech',
      submenu: [
        {role: 'startspeaking'},
        {role: 'stopspeaking'}
      ]
    }
  )

  // Window menu
  template[3].submenu = [
    {role: 'close'},
    {role: 'minimize'},
    {role: 'zoom'},
    {type: 'separator'},
    {role: 'front'}
  ]
}

const menu = Menu.buildFromTemplate(template)
Menu.setApplicationMenu(menu)
Another option to creating the menu and having it check for windows or mac is to create a main-menu.js file in the root or app directory as follows: Egghead on Electron
//====main-menu.js
const { app, Menu } = require('electron');
const isWindows = process.platform === 'win32';

module.exports = {
  setMainMenu
};

function setMainMenu() {
  const template = [
    {
      label: isWindows ? 'File' : app.getName(),
      subMenu: [
        {
          label: isWindows ? 'Exit' : `Quite ${app.getName()}`,
          accelerator: isWindows ? 'Alt+F4' : 'CmdOrCtrl+Q',
          click() { app.quit(); }
        }
      ]
    }
  ];

const menu = Menu.buildFromTemplate(template);
Menu.setApplicationMenu(menu);
}
Dev Environment Menus
You can determine if you are in the Dev or production environment using the process.env.NODE_ENV variable.
An example would be adding Development menu options to your menu. You could do this by checkin the NODE_ENV variable and if not in production, push on a new menu item to the menu template:
if (process.env.NODE_ENV !== 'production') {
  menuTemplate.push({
    label: 'Developer',
    submenu: [{
      label: 'Toggle Dev Tools',
      accelerator: 'CommandOrControl+Alt+I',
      click(item, focusedWindow) {
        focusedWindow.toggleDevTools();
      }
    }]
  })
}
accelerators
You can easily add accelerator keys within applications by adding the accelerator: property to you menu object. Note that the accelerator key options most likely will be different based on the OS that you are on, so we pass an IIFE (immediately-invoked function expression) and also use the process.platform variable to set these up:
      {
        label: 'Quit',

        accelerator: (() => {
          if (process.platform === 'darwin') {
            return 'Command+Q';
          } else {
            return 'Ctrl+Q';
          }
        })(),

        click() {
          app.quit();
        }

// OR Use a terniary expression
    {
        ...
        accelerator: process.platform === 'darwin' ? 'Command+Q' : 'Ctrl+Q',
        ...
      }
Key Options: Electron Docs
- Command (or Cmd for short)
- Control (or Ctrl for short)
- CommandOrControl (or CmdOrCtrl for short) - On Linux and Windows, the Command key does not have any effect so use CommandOrControl which represents Command on macOS and Control on Linux and Windows to define some accelerators.
- Alt
- Option - Use Alt instead of Option. The Option key only exists on macOS, whereas the Alt key is available on all platforms.
- AltGr
- Shift
- Super - The Super key is mapped to the Windows key on Windows and Linux and Cmd on macOS.
function calls
To associate an action with a menu and it's accelerator, you simply add a click() {} function to the menu object you are working on. See example above.
Creating a New Window
Easy as creating a new window instance with a new BrowserWindow({}) call.
Example function:
function createAddWindow() {
  addWindow = new BrowserWindow({
    width: 300,
    height: 200,
    title: 'Add New Todo'
  });

  addWindow.loadURL(`file://${__dirname}/add.html`);
  //Garbage collection call.  Makes sure addWindow is properly destroyed when closed
  addWindow.on('closed', () => addWindow = null);
}
Example use case:
Let's say I want to show a help guide when the user selects a menu option.
I can set up the menu option to call a showUserGuide function.
//------------------------------------------------
//Setup Help window function to show help from menu
//The showUserGuide function is called from the Help/User Guide menu option
let helpWindow;
const showUserGuide = () => {
  //If helpWindow already defined, give it focus and leave function
  if (helpWindow) {
    helpWindow.focus();
    return;
  }
  //Define new BrowserWindow
  helpWindow = new BrowserWindow({
    width: 1000,
    height: 1000,
    title: 'Analytix Installer User Guide',
    icon: path.join(__dirname, 'assets/icon.ico')
  });
  //When use closes help window, null its variable
  helpWindow.on('closed', () => {
    helpWindow = null;
  });
  //Load help file HTML file into BrowserWindow
  helpWindow.loadURL(`file://${__dirname}/public/EAInstallerHelp.html`);
};
We must set up the helpWindow variable outside the function so that is can be accessed later.
Since we don't want multiple instances of the User Guide window to be opened, we can check to see if the helpWindow variable has been initialized and if so, just give it focus. If not, then create the window.
We will need to set the variable helpWindow to null on the 'closed' event.
Setting the Window Title and Icon
There are two ways to set the the title of a window.
- Pass the title property when instantiating via the
new BrowserWindow({ title: '' })call. - Set the
<title>my Title </title>property in the html file used for the window.
NOTE: the <title> will take precedence if you set both.
My rule is to only use it via the BrowserWindow() call. This will allow you to control via code.
The icon for the window is set by passing the icon: '' property to the BrowserWindow() call.
NOTE: when setting the icon for the application, make sure to add it to the package.json file in the build section.
  "build": {
    "appId": "com.mccoid.car-service-tracker",
    "files": [
      "build/**/*",
      "node_modules/**/*"
    ],
    "directories": {
      "buildResources": "./assets"
    },
    "win": {
          "icon": "assets/cartracker.ico"
        }
  },
As a rule, I believe the ico file needs to be 256x256.
Frameless Windows
Key take away from these docs is the fact that we can use some webkit CSS rules to keep users from being able to select things like the H1 tags, etc.. Also we can make a region draggable.
Draggable Regions
By default, the frameless window is non-draggable. Apps need to specify -webkit-app-region: drag in CSS to tell Electron which regions are draggable (like the OS's standard title bar), and apps can also use -webkit-app-region: no-drag to exclude the non-draggable area from the draggable region. Note that only rectangular shapes are currently supported.
Note: -webkit-app-region: drag is known to have problems while the developer tools are open. See this GitHub issue for more information including a workaround.
To make the whole window draggable, you can add -webkit-app-region: drag as body's style:
<body style="-webkit-app-region: drag">
  </body>
And note that if you have made the whole window draggable, you must also mark buttons as non-draggable, otherwise it would be impossible for users to click on hem:
button {
    -webkit-app-region: no-drag;
  }
If you're setting just a custom title bar as draggable, you also need to make all buttons in title bar non-draggable.
Text Selection
In a frameless window the dragging behaviour may conflict with selecting text. For example, when you drag the titlebar you may accidentally select the text on the titlebar. To prevent this, you need to disable text selection within a draggable area like this:
.titlebar {
    -webkit-user-select: none;
    -webkit-app-region: drag;
  }
Creating Native Dialogs
You can create the Open, Save and standard Message box dialogs.
Using Remote
Remote Docs The remote module provides a simple way to do inter-process communication (IPC) between the renderer process (web page) and the main process.
In Electron, GUI-related modules (such as dialog, menu etc.) are only available in the main process, not in the renderer process. In order to use them from the renderer process, the ipc module is necessary to send inter-process messages to the main process. With the remote module, you can invoke methods of the main process object without explicitly sending inter-process messages.
I have used this mainly for native file access. The remote module lets you get paths to files.
const { remote } = require('electron');

//Can't access the remote.app. feature except from within a function.  Probably after app has loaded.
//pass the filename including extension, will return the path, relative to where the GroupCreate.EXE
//is located in production and relative to where electron index.js is in Dev.
const getLocalFile = (dataFile) => {
    if (process.env.NODE_ENV === 'development' || process.env.NODE_ENV === 'dev-home') {
        return path.join(remote.app.getAppPath(), '/dataFiles', dataFile);
    }
    return path.join(path.dirname(remote.app.getPath('exe')), '/dataFiles', dataFile);
};
IPC - Inter-process Communication
Allows the Electron main application to communicate and send data to the BrowserWindow children.
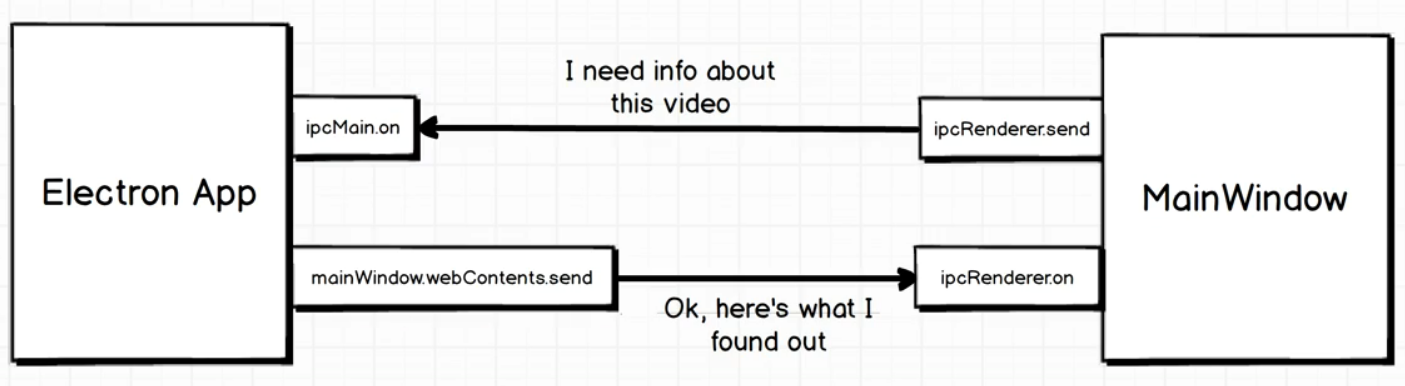
Notice that each process, electron and HTML (front-end), has it's own send and receive functions.
Front end (Main Window in diagram), you have:
- ipcRenderer.send - sends message back to electron process
- ipcRenderer.on - sets up a listener for messages being sent to window.
Electron Process
- mainWindow.webContents.send - mainWindow is the handle to the window we are sending data to.
- ipcMain.on - sets up a listener for messages being sent from a window (HTML/front-end)
Send and Receive via IPC (Front-end)
The first step is to use the ipcRenderer from electron in our HTML (or React or other front end) to send the message:
SEND From Front-end HTML
//--addTodo.html
  <script>
  const electron = require('electron');
  const { ipcRenderer } = electron;

    document.querySelector('form').addEventListener('submit', (event) => {
      event.preventDefault();
      //Get value from input element
      const newTodo = event.target.querySelector('input').value;
      //send via ipcRenderer process.  the 'todo:add' is whatever you want.
      ipcRenderer.send('todo:add', newTodo);
    });
  </script>
Note that the 'todo:add' argument is user specified and will be used on the receiving end also. So you should use descriptive terms here. The second argument is the value we are sending.
SEND from a React application. Pretty much the same as in HTML, but you will need to use the following to get at the ipcRenderer function. The window.require is important, something about using the electron require that is in the global window space versus whatever webpack uses.
const { ipcRenderer } = window.require('electron');
Receive From Front-end
//--main.html
  <script>
    const electron = require('electron');
    const { ipcRenderer } = electron;

    ipcRenderer.on('todo:add', (event, todo) => {
        const li = document.createElement('li');
        const text = document.createTextNode(todo);
        li.appendChild(text);
        document.querySelector('ul').appendChild(li);
    });
  </script>
Note that, as you will see, this window (html file) has been targeted with a 'todo:add' message. Meaning, when you send data from the electron process, you must send it to a specific window.
Send and Receive via IPC in Electron Process
In our main electron process (index.js), we get ipcMain from the electron object and set a listener on it. This listener will fire whenever the event it is looking for happens:
const { app, BrowserWindow, Menu, ipcMain } = electron;  //destruction off the electron object

...

//Watch for the 'todo:add' event to happen, then execute the callback.
ipcMain.on('todo:add', (event, todo) => {
//Target the window you want to receive the message (it must establish an "on" listener)
  mainWindow.webContents.send('todo:add', todo);
  addWindow.close();  //Make sure you garbage collect this window in your window creation function.
});
Useful NPM Modules
Electron-Window-State
Stores and restores window sizes and positions in your Electron App.
$ npm install --save electron-window-state
const windowStateKeeper = require('electron-window-state');
let win;

app.on('ready', function () {
  // Load the previous state with fallback to defaults
  let mainWindowState = windowStateKeeper({
    defaultWidth: 1000,
    defaultHeight: 800
  });

  // Create the window using the state information
  win = new BrowserWindow({
    'x': mainWindowState.x,
    'y': mainWindowState.y,
    'width': mainWindowState.width,
    'height': mainWindowState.height
  });

  // Let us register listeners on the window, so we can update the state
  // automatically (the listeners will be removed when the window is closed)
  // and restore the maximized or full screen state
  mainWindowState.manage(win);
});
Cheatsheet
mac vs windows Check the process.platform variable
- 'win32'
- 'darwin' is mac
Hide icon on doc on mac app.dock.hide() But it doesn't work on windows (will throw error)
BrowserWindow event Listeners
- 'blur'
- 'ready-to-show' - fires when the initial DOM has been rendered.
...
app.on('ready', () => {
  mainWindow = newBrowserWindow({
    show: false
  });
  mainWindow.loadURL(...);
  mainWindow.on('ready-to-show', () => {
    mainWindow.show();
  });
});
BrowserWindow functions
  mainWindow = new BrowserWindow({
    width: 300,
    height: 500,
    frame: false,
    resizable: false,
    show: false
  });
  //Loads the URL to show
  mainWindow.loadURL(`file://${__dirname}/src/index.html`);
  //sets up an event listener
  mainWindow.on('blur', () => {
    //hides the window
    mainWindow.hide();
  });
  //shows the window
  mainWindow.show();
  //Get the size of the window
  const {width, height} = mainWindow.getBounds();
  mainWindow.setBounds({
    x, //x position of the upper left corner
    y, //y position of the upper left corner
    height,
    width
  })
backgroundThrottling - When an app loses focus chromium throttles the app. If you have a timer of something else running, it will pretty much stop until the app gets focus. Pass the backgrounThrottling web preference to the BrowserWindow constructor to keep this from happening.
  constructor(url) {
    super({
      width: 300,
      height: 500,
      frame: false,
      resizable: false,
      show: false,
      webPreferences: { backgroundThrottling: false}
    });